IN THIS ARTICLE
Data Driven Root Motion
Root motion is animation that moves an actor entity. This tutorial explains what root motion is in detail, and how to enable it for an actor.
For this tutorial, you’ll need an actor asset with animation that has been processed by Asset Processor. The animation should move the actor off the scene origin. That is, the animation should move the actor in a direction, such as a walk cycle that moves the actor forward in space.
What is root motion?
An actor entity usually has many components (meshes, a skeleton, colliders, and so on) that need to move together. If an actor jumps, the actor’s collision capsule needs to have the same jump movement applied so that it moves with the skeleton and meshes. This movement, that moves all of the actor’s components, is the root motion.
Root motion can be code driven or data driven. The focus of this tutorial is data driven root motion, but it’s helpful to understand both methods.
Code driven
For code driven root motion, the actor’s animation cycles happen in place, and any movement off the scene origin is provided by code (such as a script). The actor runs, walks, or jumps in place, and the script provides the appropriate directional movement.
The following movie demonstrates a forward run cycle created for code driven root motion:
Notice that the actor runs in place. At runtime, when a forward input event is received, the script plays the preceding forward run cycle and moves the actor entity forward based on the result of some expression or function.
Data driven
For data driven root motion, motion data is provided that moves the actor off the scene origin. The data is usually keyframe animation provided by an animator. The following movie demonstrates a forward run cycle created for data driven root motion:
Notice that the actor is moving forward as it runs. At runtime, when a forward input event is received, the forward run cycle plays. The animation data from the root of the actor’s skeleton drives the forward movement of the actor entity.
Note:The preceding example movies display the actor’s bones as green lines. The green line that extends from the ground plane to the actor’s pelvis is the root bone of the skeleton. In an ideal scenario, actor assets should have this root bone, and any animation that moves the actor off of the scene origin should be applied to this root bone.
Which should you use?
Whether you use code driven or data driven root motion depends on your project’s needs.
Code driven root motion might be preferable in scenarios where precise actor movement for play mechanics is more critical than visual performance. Platform games and fighting games, for example, usually require accurate actor movement. Ensuring an actor moves a precise distance in response to an input might be far more important than ensuring actor’s movement relative to animation is visually accurate.
Data driven root motion can give animators more control over the actor’s performance. Adventure games and first person games that strive for realism and immersion often require the actor’s movement express some game condition or emotion. In these scenarios, the actor’s movement relative to animation might prioritize visual accuracy.
The remainder of this tutorial focuses on data driven root motion. You’ll learn how to determine if an actor is properly set up for data driven root motion, extract root motion if necessary, and enable root motion in Animation Editor.
Root motion setup
The data in data driven root motion is usually keyframe animation applied to the root bone of an actor’s skeleton by an animator. In an ideal scenario, the actor and animation source scene files follow these rules:
- The skeleton has a root bone placed at the scene origin.
- The root bone is connected to the actor’s pelvis bone (or some relative bone on an actor that isn’t a biped).
- Any motion that moves the actor off the scene origin is keyframed on the root bone.
Check actor setup
To determine if the actor has a root bone with animation, do the following:
In O3DE Editor, from the Tools menu, choose Animation Editor.
In Animation Editor, press Ctrl + O to open the actor. Select an actor from the file window.
Choose the
Visibility button above the viewport, and select Line skeleton from the list to display the actor’s skeleton as green lines.
In the Motion Sets tab, in the Motion Set group, choose the
Folder button to add a motion. Select a motion from the file window.
Click the motion you just added to the Motion Set to select it.
In the Time View tab, click the
Play button to play the animation.
Examine the animation as it plays. If the skeleton has a root bone (a green line extending from the ground plane to the actor’s pelvis) that moves with the actor, then the actor has a root bone with animation. In the following example, notice the green line that represents the root bone extends from the ground and moves with the actor:
The following table contains the possible results from the preceding steps and provides a course of action for each result:
| Result | Next Step |
|---|---|
| The actor animates in place. | This actor might not have a root bone and doesn’t have animation data for root motion. You can either:
|
| The actor moves off the scene origin, but one end of the green line that represents the root bone remains at the scene origin. | This actor doesn’t have a root bone. The animation data is applied to another bone (such as the pelvis). You can either:
|
| The actor moves off the scene origin, the root bone moves with the actor, and the actor snaps back to the scene origin when the animation cycle completes. | The actor has a root bone with animation data. You can move on to the Enable root motion section. |
Important:For the best result, edit the source scene files in your digital content creation application (Blender or Maya, for example) and add a root bone with animation.
Root motion extraction
If your source scene files have animation that moves the actor off the scene origin, but the root bone doesn’t move with the actor, it’s likely that the source scene files don’t have a root bone and that animation has been applied to another bone such as the pelvis bone. You can try to extract the animation from the pelvis so it can be applied to the actor as root motion.
To extract root motion from an animation you must customize how the animation is processed with the Scene Settings tool. To create a custom processing rule with a Root motion extraction modifier, do the following:
In O3DE Editor in Asset Browser locate the
.fbxfile containing the animation you want to extract the root motion from.In Asset Browser, right-click the animation file and choose Edit settings… from the context menu.
In Scene Settings, select the Motions tab.
Choose Add Modifier and select Root motion extraction from the modifier list.
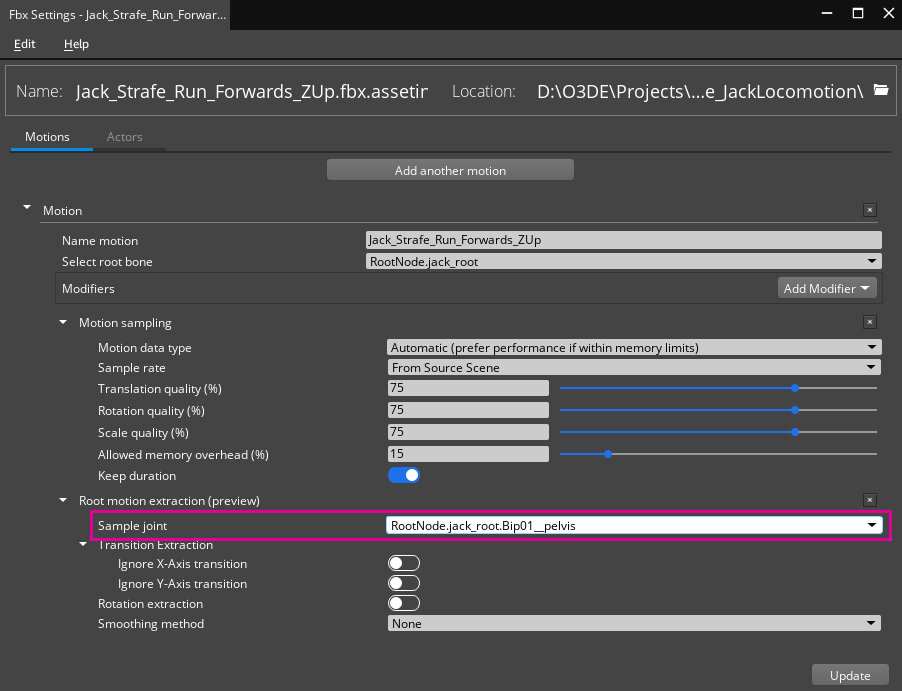
Note:A source scene file might contain more than one motion. You’ll need to add a Root motion extraction modifier to each motion that requires it.In the Root motion extraction modifier, ensure the Sample joint property is set to the bone containing the motion you want to extract as in the following example:

By default, the bone’s translation is extracted. You can choose to ignore the X or Y axis translation, and extract rotations by setting the properties in the modifier.
With the modifier configured, choose Update to save your custom processing rule. The animation is automatically processed by Asset Processor. Close the output window and exit Scene Settings.
When the motion is processed, the root motion is extracted and applied to the root bone in the motion product asset. You can verify if the root motion extraction was successful by repeating the steps in the Check actor setup section.
The following table provides additional detail on the options provided by the Root motion extraction modifier:
| Option | Description |
|---|---|
| Sample Joint | The bone that root motion is extracted from. Usually, this is the hip or pelvis (or some relative bone for actors that aren’t bipeds). |
| Ignore X-Axis transition | When enabled, X-axis translations aren’t extracted. The X translation of the root motion is set to 0.0. |
| Ignore Y-Axis transition | When enabled, Y-axis translations aren’t extracted. The Y translation of the root motion is set to 0.0. |
| Rotation extraction | When enabled, rotations are also extracted for the root motion. |
| Smoothing method | Select a smoothing method you want to apply to the motion data. Smoothing the data reduces any drastic position or rotation changes. |
| Smooth position | When enabled, translations of the root motion animation data are smoothed. |
| Smooth rotation | When enabled, rotations of the root motion animation data are smoothed. |
| Smooth frame number | The number of samples, specified in frames, that each data point should use to apply smoothing. Larger values usually result in smoother animation data. |
Enable root motion
Once you have root motion applied to the actor’s root bone, you must enable root motion for the actor by following these steps:
In Animation Editor, press Ctrl + O to open the actor. Select an actor from the file window.
In the Motion Sets tab, in the Motion Set group, choose the
Folder button to add the motion. Select a motion that contains root motion from the file window.
Choose the motion you just added to the Motion Set to enable it.
In the Actor Manager tab, click the actor instance to select it.
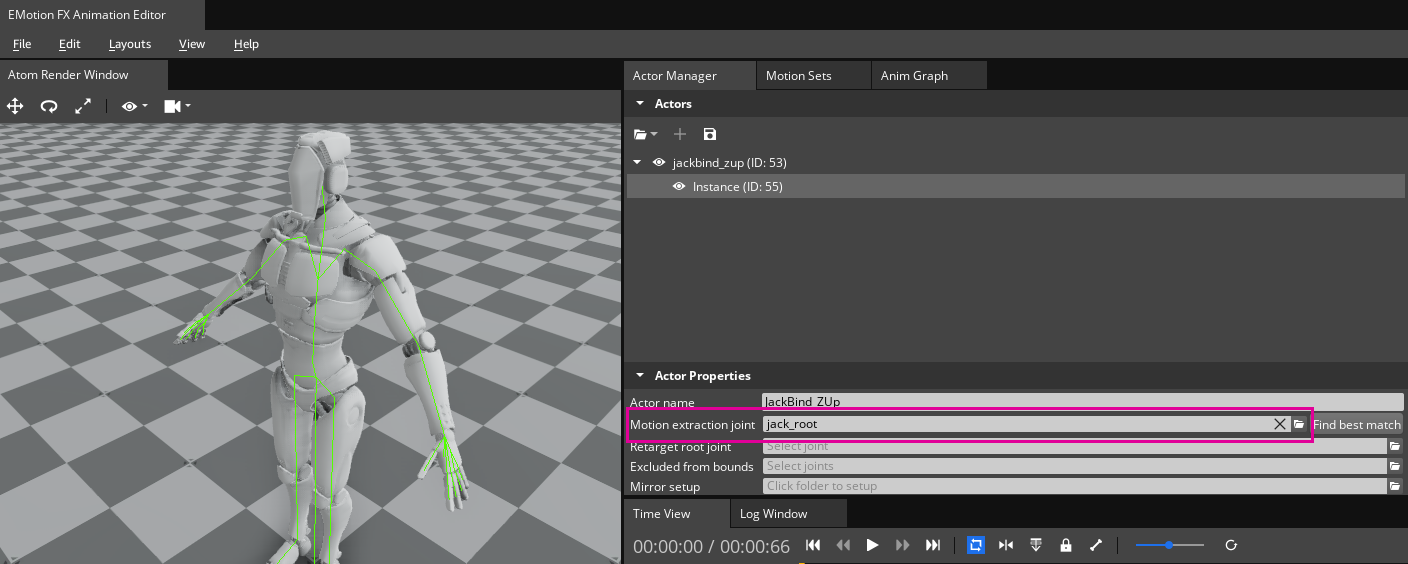
In the Actor Properties pane, ensure the root bone is selected in the Motion extraction joint property. If you choose Find best match, Animation Editor will try to select the appropriate bone.

Press Ctrl + S to save the actor.
If root motion is successfully enabled, you’ll see the actor repeat the animation cycle without popping back to the scene origin. This means the root movement of the actor is driven by animation data.
