IN THIS ARTICLE
Spawn and Despawn a Prefab
In this tutorial, you’ll learn how to spawn and despawn prefab instances in Open 3D Engine (O3DE). You’ll create a prefab to spawn, create a spawner entity, assemble a spawning script with Script Canvas Editor, and test the results. You should be familiar with entity and prefab basics before working through this tutorial.
| O3DE Experience | Time to Complete | Feature Focus | Last Updated |
|---|---|---|---|
| Beginner | 25 Minutes | Spawning and despawning prefabs with Script Canvas. | January 13, 2023 |
Prerequisites
- Basic knowledge of working with O3DE Editor.
- Basic knowledge of working with Script Canvas Editor.
- A project built from the standard project template or one that contains the Gems in the standard template.
Create a prefab
Follow the steps in this section to create a prefab to spawn. If you already have a prefab to use for this tutorial, skip ahead to the next section, Create a spawner entity.
In O3DE Editor, create an entity with a Mesh component. You can use any available mesh for this tutorial. Drag a
.azmodelfrom Asset Browser into the viewport to create an entity with a Mesh component.Right-click the new entity in Entity Outliner and choose Create Prefab… from the context menu.
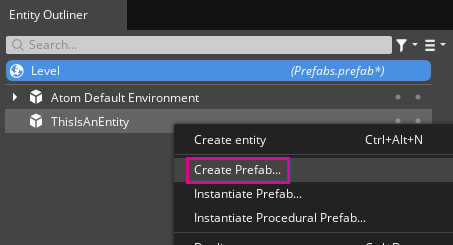
In the Save As… window, navigate to a directory in your project, such as the
Prefabsdirectory, supply a name for the prefab, and choose Save.The entity you created has been converted to an instance of the prefab you just saved. You’ll create a script to spawn a prefab instance, so you can remove this instance from the level. Select the prefab instance in Entity Outliner and press Delete to remove it.
Create a spawner entity
In this section, you’ll create an entity that runs the script that spawns the prefab instance.
Create a new entity named
Spawner.Ensure the new entity is placed in the camera view by dragging the entity in the viewport with the translate gizmo. You can display the camera’s view frustum by choosing the
Helpers button at the top of the viewport and selecting Helpers from the list.
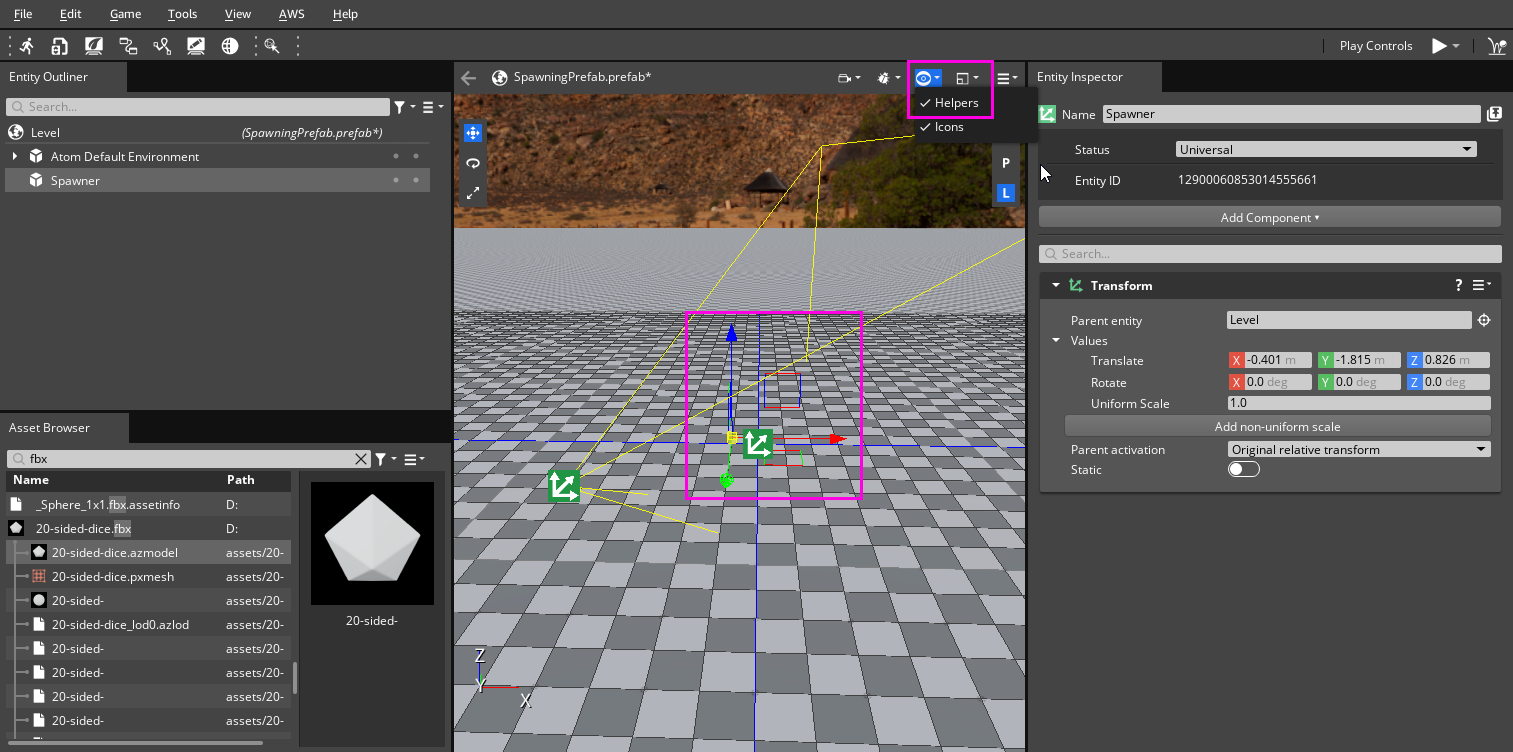
Add a Script Canvas component to the spawner entity. In Entity Inspector, choose Add Component and select Script Canvas from the component list.
Press Ctrl + S to save the level with the spawner entity.
In the Script Canvas component, click the
Open application button to open Script Canvas Editor.

Spawn a prefab
In this section, you’ll create a script that spawns a prefab. You’ll learn the basics of Script Canvas Editor including creating variables, placing and connecting nodes, and using references.
Script Canvas Editor opens with an empty graph canvas window. For this script, you’ll use On Graph Start for the entry point so that the script logic runs immediately when the spawner entity is activated. In the Node Palette, expand the Timing group. Drag an On Graph Start node into the graph canvas window. Script Canvas creates an new node graph automatically.
The script needs to reference the prefab that you want to spawn. Create a variable to reference the prefab with the following steps:
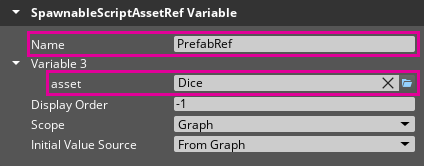
In Variable Manager, choose Create Variable, and select SpawnableScriptAssetRef from the variable type list.
Give the SpawnableScriptAssetRef variable a name. In Node Inspector, enter
PrefabRefin the Name property.Add the prefab you want to spawn to the variable. In Node Inspector, choose the
File button and select the prefab you want to spawn for the asset property.
The script needs a variable that holds information about the spawned prefab instance. Create one with the following steps:
In Variable Manager, choose Create Variable, and select EntitySpawnTicket from the variable type list.
Give the EntitySpawnTicket variable a name. In Node Inspector, enter
SpawnTicketin the Name property.
Add a Create Spawn Ticket node to the graph canvas. Use the search field at the top of the Node Palette to filter the node list. Drag a Create Spawn Ticket node into the graph canvas to the right of the On Graph Start node.
Note:You can also right-click in the graph canvas to access the node list.Connect the nodes. Drag from the Out pin on the On Graph Start node to the Create Ticket pin on the Create Spawn Ticket node to connect the nodes.
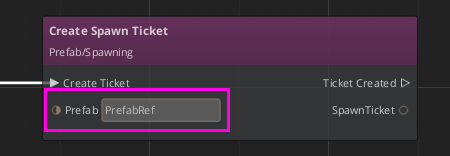
Add the prefab reference to the Create Spawn Ticket node. Right-click on the Prefab pin and select Convert to Reference from the context menu. The property is automatically set to the PrefabRef variable you created in step 1. You can choose the
Settings button in the Prefab field to select a variable reference if necessary.
Add a Spawn node from the Prefab/Spawning node group to the graph canvas and connect it to the Create Spawn Ticket node with the following steps:
Connect the Ticket Created pin from the Create Spawn Ticket node to the Request Spawn pin of the Spawn node.
Connect the SpawnTicket pin from the Create Spawn Ticket node to the SpawnTicket pin of the Spawn node.

In addition to spawning prefab instances, the Spawn node also needs to populate the SpawnTicket variable with data. On the Spawn node, right-click on the SpawnTicketOut pin and select Convert to Reference from the context menu. The property is automatically set to the SpawnTicket variable you created in step 2. You can choose the
Settings button in the SpawnTicketOut field to select a variable reference if necessary.
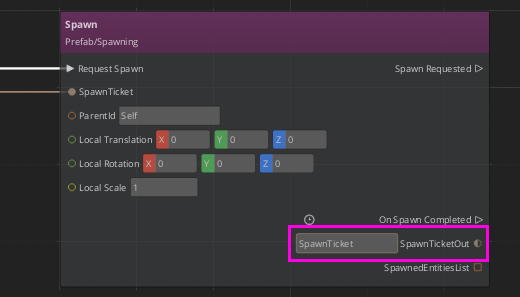
Press Ctrl + S to save the script. In the Save As window, name the file
spawn-despawn-prefab.scriptcanvasand choose Save.
The script you’ve created thus far spawns a prefab instance at the spawner entity’s location when it’s activated. You can add the script to the spawner entity’s Script Canvas node, and press Ctrl + G to test the script. In the final steps of the tutorial you’ll learn how to despawn a prefab.
Delay and despawn
In this section, you’ll add a three second delay to the script, after which, the prefab despawns.
Add a Delay node from the Timing group to the graph canvas and connect it with the following steps:
Connect the On Spawn Completed pin of the Spawn node to the Start pin of the Delay node.
On the Delay node, set the Start Time property to
3to create a three second delay.
Add a Despawn node from the Prefab/Spawning group to the graph canvas and connect it with the following steps:
Connect the Done pin of the Delay node to the Request Despawn pin of the Despawn node.
On the Despawn node, right-click on the SpawnTicket pin and select Convert to Reference from the context menu. The property is automatically set to the SpawnTicket variable you created. You can choose the
Settings button in the SpawnTicket field to select a variable reference if necessary.
Press Ctrl + S to save the script. The following image displays the complete Script Canvas graph.

Test the results
Now you’ll add the script to the spawner entity and test the script.
In O3DE Editor, select the spawner entity.
In Entity Inspector, In the Script Canvas component, choose the
file browser icon and select the
spawn-despawn-prefab.scriptcanvasfile you created.
Press Ctrl + G to run the level and test the script.
Conclusion and next steps
Congratulations! You’ve learned to spawn and despawn a prefab instance. These are critical concepts to working in O3DE. Here are some ideas for building on what you’ve learned in this tutorial:
- Can you randomize the delay before despawning the prefab instance?
- See if you can work out how to spawn the prefab instance at a location of your choosing. Hint: Play with the transform properties on the Spawn Script Canvas node.
- Can you spawn multiple prefab instances at different locations from a single spawner entity?
