IN THIS ARTICLE
Converting Components
This tutorial teaches you how to use the Legacy Content Conversion on Lumberyard levels and slices. This process will convert legacy entity components to their O3DE equivalent. It is also able to target assets located in another project. Additional sections of the tutorial will show how to open a Lumberyard level with O3DE.
| O3DE Experience | Time to Complete | Feature Focus | Last Updated |
|---|---|---|---|
| Intermediate | 1 Hour | Convert legacy components and open .ly and .slice files with O3DE | February 27, 2024 |
Note:You will need to use a custom build of O3DE to follow this tutorial. Check Settings up O3DE from GitHub to learn how to proceed.
Check your Assets file hierarchy
If you followed the previous steps, your setup should currently be :
- You have the Starter Game project and you are able to open it with Lumberyard.
- You have an Asset gem that contains the converted assets from the Starter Game project.
- You have an empty O3DE project which uses your local Asset gem as a dependency
In order to properly convert the levels to O3DE, you to make sure that the relative path of your converted assets is the same as the Lumberyard project :
- For a Gem asset the relative path starts from the Assets folder
- For a Project asset the relative path starts from the project’s folder (and not from the Assets folder that it might contain)
| Path | Relative Path |
|---|---|
| C:\my-o3de-gem\Assets\test.fbx | test.fbx |
| C:\my-o3de-project\SamplesProject\Assets\test.fbx | Assets\test.fbx |
You don’t have to overthink it, simply put folders that were in a Lumberyard Gem in a O3DE Gem, and what was in the StarterGame project in your O3DE project. Textures have been renamed during the conversion in order to be imported with the correct settings, so you don’t need to rename them.
Known issue:If you are converting the StarterGame project, you should rename or delete the
There is no information listed for this issue. Add information by referencing an issue, discussion, or pull request.trees_atlas_am_oak_leaf_02.azmaterial. This material is currently applied on trees while it shouldn’t, and trees will not have their materials rendered if we keep it.
Generate the AssetCatalog file
The assetcatalog.xml file is a list of every assets processed for a given project along with their relative path and asset id. It is generated when you open a O3DE project (under YOUR_PROJECT_FOLDER\Cache\pc) and we rely on it to find the asset ids that O3DE attributed to our converted assets.
We need a custom build of O3DE because this file is in binary by default and we need to change that to XML to be able to parse it in our pyton script. Open a code editor and go to YOUR_O3DE_REPO/Tools/AssetProcessor/native/AssetManager/AssetCatalog.cpp. In AssetCatalog::SaveRegistry_Impl() change AZ::ObjectStream::ST_BINARY to AZ::ObjectStream::ST_XML.
// these 3 lines are what writes the entire registry to the memory stream
AZ::ObjectStream* objStream = AZ::ObjectStream::Create(&catalogFileStream, *serializeContext, AZ::ObjectStream::ST_XML);
{
    QMutexLocker locker(&m_registriesMutex);
    objStream->WriteClass(&m_registries[platform]);
}
Then delete the Cache folder inside of your project folder and relaunch the engine. You will have to wait for the asset processor tasks to be over (if you used Lumberyard before make sure to close the Lumberyard Asset Processor in the task bar before launching O3DE).
You will be able to revert this change once that you have successfuly ran the Legacy Content Conversion script.
Remove layers from the Lumberyard level
In theory level layers are still supported by O3DE when prefab system is disabled. However in practice with levels as large as the StarterGame it will crash when you open the level. Moreover, the SerializeContextTools used to convert levels to prefab in the next section is not yet able to parse layers.
This means that you need to delete layers by hand and move their entities to a new parent entity. For nested layers you need to do the same operation. It takes around 25 minutes to do this on the StarterGame level.
Don’t forget to close the asset processor from the task bar once that you close Lumberyard, else the O3DE asset processor will not be launched.
Run the Legacy Content Conversion script
The script is located in YOUR_O3DE_REPOSITORY\Gems\AtomLyIntegration\CommonFeatures\Assets\Editor\Scripts\LegacyContentConversion\LegacyComponentConverter.py. By itself the script is straightforward and has no third-party dependencies, however it expects to be launched from the Lumberyard dev folder so you need to open a command line there. Then run (make sure to update the args) :
YOUR_O3DE_REPOSITORY\python\python SCRIPT_PATH\LegacyComponentConverter.py -project=StarterGame -include_gems -assetCatalogOverridePath=YOUR_O3DE_PROJECT_PATH\Cache\pc\assetcatalog.xml
You will see multiple warnings about “Could not match (…) to a corresponding source atom material”. If you look closely these warnings are always about "_physics" or "_proxy" materials. This is done on purpose as these materials are not really supported in Atom so we simply skip them (they are skipped via the “Skip White Texture Materials” in the Legacy Asset Converter).
Caution:This tool is destructive, it changes the files inline and does not create a copy. It is recommended that you track your Gems, Levels and Slice Lumberyard folders with Git (or make a copy) if you want to go back after the conversion.
If you want to check the diff between old and new slice files, make sure to hide whitespace changes else most lines will be marked.
(Optional) Open the modified Lumberyard level in your O3DE project
For now O3DE is still able to open .slice and .ly files but
support will be removed from the engine at some point. To toggle this setup, you just need to disable the prefab system via an hidden user setting. Create a new file or replace the content in YOUR_O3DE_PROJECT\user\Registry\editorpreferences.setreg with what is shown below.
{
    "Amazon": {
        "Preferences": {
            "EnablePrefabSystem": false
        }
    }
}
Then you will need to copy by hand the slices and level files. For the StarterGame project these are the most important folders that you need to copy into your O3DE project :
| Lumberyard Location | O3DE Location |
|---|---|
| dev\StarterGame\Levels | YOUR_PROJECT\Levels |
| dev\StarterGame\Slices | YOUR_PROJECT\Slices |
| dev\Gems\StarterGame\Environment\Assets\Slices | YOUR_GEM\Assets\Slices |
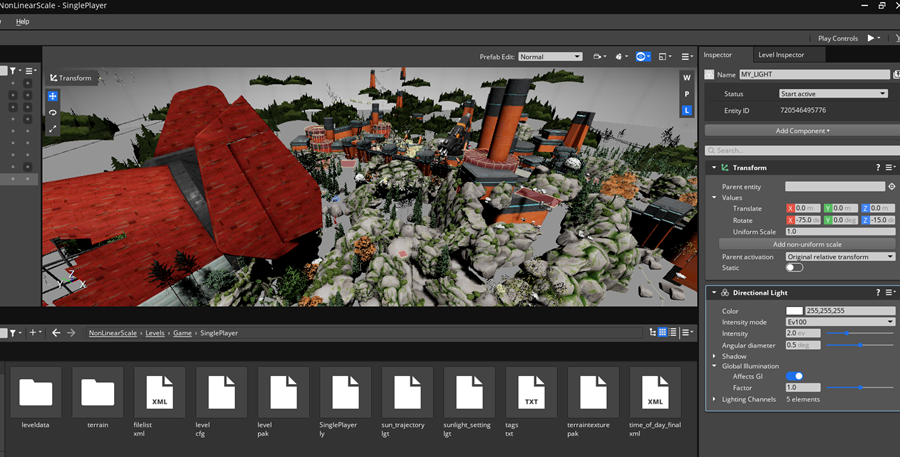
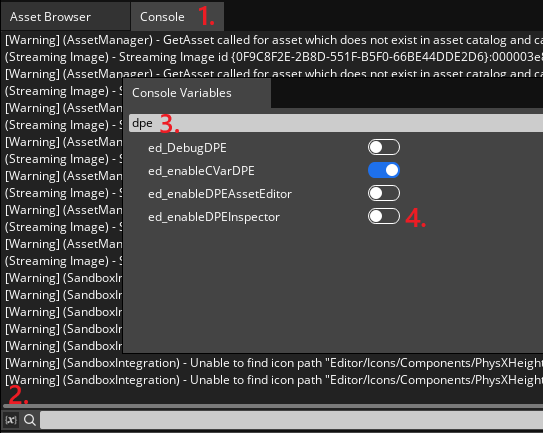
After launching the editor, you will also want to set the ed_enableDPEInspector CVar to false before opening a level. To do so navigate to the Console tab, click on the “X” icon at the bottom and search for the CVar by name.
The level will be pitch black, you can create an entity and assign it a directionnal light component with a rotation of (-75, 0, -15) and 2 as Intensity. You will also want to update the Perspective Far Plane value from 100 to 10 000 in the Editor Settings under the Viewport section. This is what it should look like :