IN THIS ARTICLE
Converting Levels
This tutorial teaches you how to use SerializeContextTools to convert legacy level files (.ly, .slice) to O3DE prefabs.
| O3DE Experience | Time to Complete | Feature Focus | Last Updated |
|---|---|---|---|
| Intermediate | 15 Minutes | Convert .ly and .slice files to .prefab and test them in O3DE | February 27, 2024 |
Note:This is a C++ tool located in the O3DE project. You will need to build this tool yourself in order to use it. Check Settings up O3DE from GitHub to learn how to make your O3DE solution.
Launch the Legacy Asset Converter application
Open the code solution and find the SerializeContextTools project. In you are using Visual Studio, you can right click on it and “Set as Startup Project”. If you are using another IDE the process should be similar.
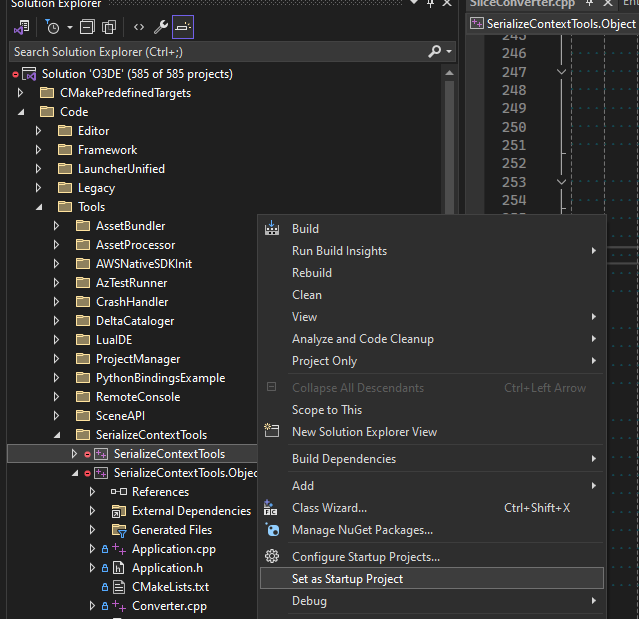
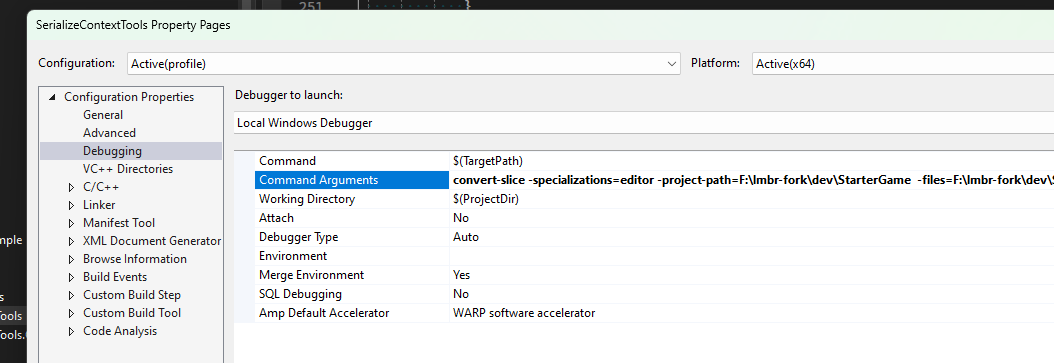
In the same right-click menu in Visual Studio, you have the “Properties” option. Use it to change the launch arguments. They are indicated below, just update YOUR_LUMBERYARD_REPO with the right path.
convert-slice -specializations=editor -project-path=YOUR_LUMBERYARD_REPO\dev\StarterGame -files=YOUR_LUMBERYARD_REPO\dev\StarterGame\Levels\*.ly -slices=YOUR_LUMBERYARD_REPO\dev\Gems\StarterGame\*.slice,YOUR_LUMBERYARD_REPO\dev\StarterGame\slices\*.slice
Then paste it in the Command Arguments field under the Debugging section. Again if you are using another IDE the process should be similar.
For now you also need to remove the AZ_Assert in the Instance.cpp file in the two following methods :
void Instance::ClearEntities()
bool Instance::RegisterEntity()
Finally you will be able to launch the process. Once everything is over you will encounter an Assertion during the application Teardown (you will see SerializeContextTools.exe!AZ::ModuleManager::UnloadModules() in the callstack). Just exit the program when it happens, the .prefab files where already generated next to the .slice files.
Copy the prefab files to your O3DE project
As explained in the
converting components section, you have to keep the same file hierarchy for the level to be able to find nested slices. In this step you have to copy by hand every .prefab file that was generated by the process.
These are the files that you need to copy over for the StarterGame level, just erase the .slice files after the copy as you won’t need them.
| Lumberyard Location | O3DE Location |
|---|---|
| dev\StarterGame\Levels\Game\SinglePlayer\SinglePlayer.prefab | YOUR_PROJECT\Levels\SinglePlayer\SinglePlayer.prefab |
| dev\StarterGame\Slices | YOUR_PROJECT\Slices |
| dev\Gems\StarterGame\Environment\Assets\Slices | YOUR_GEM\Assets\Slices |
| dev\Gems\StarterGame\Environment\Assets\Objects\Props\Diorama0X.prefab | YOUR_GEM\Assets\Objects\Props\Diorama0X.prefab |
| dev\Gems\StarterGame\Weapons\Assets\SGD1000\Slices | YOUR_GEM\Weapons\Assets\SGD1000\Slices |
Open and edit the converted level
Caution:Make sure to close the Lumberyard asset processor from the taskbar if it is still running before launching O3DE. Else O3DE asset processor will not be able to launch and you won’t be able to open nested prefabs
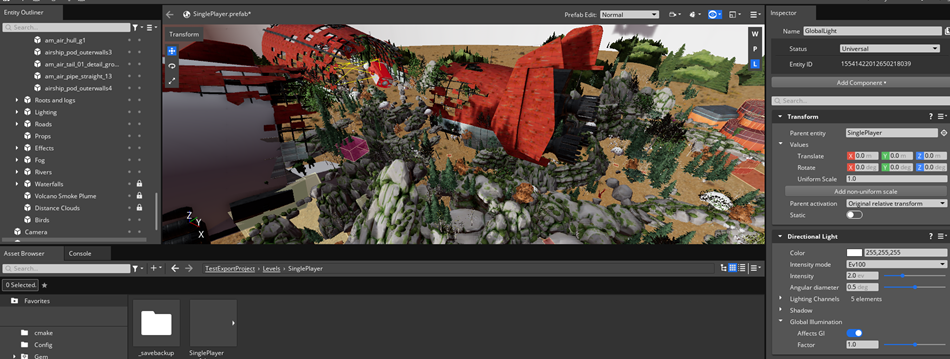
Now you will be able to launch O3DE and open the SinglePlayer level. You will encounter some warnings for a few entities about incompatible components or unresolved ones. There shouldn’t be many of them and you can hand-fix them (open the .prefab file in a code editor to find the entity or the component in question if the warning does not report the entity name).
It is also expected that a few entities (bushes, oak trees and am_air_cockpit_g1) have gray materials. This issues will be fixed in the near future.
As explained in the last converting components section, you will have to add lighting yourself in the level and expand the Perspective Far Plane in the editor settings to have the following result.