IN THIS ARTICLE
Working with O3DE Console
In O3DE Editor, the console window shows a running list of all editor commands, processes, and output. For example, when you delete an entity, the console shows the action and the output. You can use the console to enter or modify console variables (CVARs). Console variables are a type of variable that you can manipulate in O3DE Editor.
Viewing the Console Window
You can enter commands directly in the console window or search and edit console variables.
To view the console window
In O3DE Editor, choose Tools, Console.
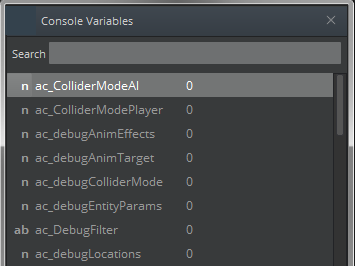
Click the X icon in the left corner to open the Console Variables window. The Console Variables window lists all available console variables.

Enter a name to search for a specific console variable. To learn more about the console variable, pause on the name.
Exporting All Console Commands and Variables
You can retrieve a complete list of console commands and variables, including their descriptions and assigned values.
To export a list of all console commands and variables
In the Console window, enter the following command: DumpCommandsVars
Navigate to the O3DE directory and then open the
consolecommandandvars.txtfile. ExampleYou can see the available commands and variables in the file. 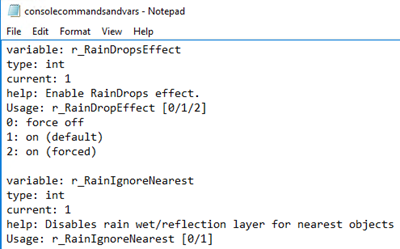You can specify a sub-string parameter to restrict the results that you want. For example, the DumpCommandsVars i_ command exports all commands and variables that begin with the prefix
i_, such asi_giveallitemsandi_debug_projectiles.
Configuring Console Variables
Console variables can also be set in code or specified in configuration files. Console variables are executed in the following order:
Configuration files:
- The
game.cfgfile in your project directory - The
system_gamesystem.cfgfile for your game system - The
engine\config\user.cfgfile - The
level.cfgfile in your project’s level directory
- The
Code
Console variables typed directly into the console
The order of execution is also the override order. For example, console variables set in code override those set in configuration files \(and `level.cfg` overrides `user.cfg`, and so on\). Console variables set in flow graphs override any identical console variables set in code. Finally, console variables typed directly into the console override all the other console variable settings.
Configuring Console Variables in the Console
You can specify values for console variables in the console to apply changes to your level.
To configure console variables in the console
Do one of the following: - In the Console Variables window, search for the variable name, double-click the value, and then enter the value that you want. - In the Console command line, enter the console variable and its value, and then press Enter. For example, enter the r_DisplayInfo=1 command to display debugging information in the viewport.
Configuring Console Variables in Configuration Files
You can specify values for console variables in the configuration files, such as the level configuration file \( `level.cfg`\).
To configure console variables with a configuration file
Navigate to the directory that has the configuration file. For example, if you want to configure the
level.cfgfile, navigate to theLevels\level_namedirectory in your project.Use a text editor to edit the file or to create one.
Specify the console variable name and the value. For example:
r_DisplayInfo=1shows debugging information in the viewport.Save the file.