IN THIS ARTICLE
Virtual Gamepad Gem
Use the Virtual Gamepad Gem to provide your project’s UI with touch screen capabilities on mobile devices. After you enable the Virtual Gamepad Gem, you can add the virtual gamepad components to your project’s UI in the UI Editor.
The Virtual Gamepad Gem includes a sample UI canvas that you can either customize for your game or use as an example for a new UI canvas. To view this canvas in the UI Editor, open Gems\VirtualGamepad\Assets\UI\Canvases\VirtualGamepad\VirtualGamepad.uicanvas.
There is no limit for the number of active UI canvases that can contain virtual gamepad components. This means you can create many virtual gamepad canvases to display for the appropriate scenarios, or even at the same time. For example, you can show a different UI canvas on each half of your virtual gamepad.
Configuring virtual gamepad behavior
You can configure the virtual gamepad’s behavior in UI Editor. To configure virtual gamepad behavior, do the following:
In UI Editor, add the UI components VirtualGamepadButton and VirtualGamepadThumbStick to the UI canvas.
For each component, select an Input Channel.

For more information about input in O3DE, see Input in Open 3D Engine.
Virtual Gamepad component properties
The Virtual Gamepad Gem features two components that you can use to customize input for your mobile games:
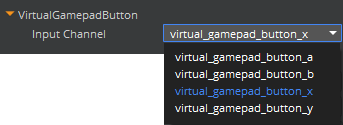
VirtualGamepadButton has one property, Input Channel. Select the appropriate input.
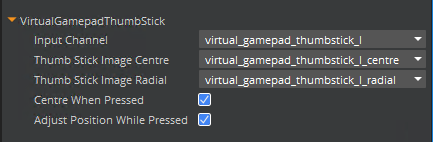
VirtualGamepadThumbstick has the following properties:
Displaying the virtual gamepad at runtime
You can enable the virtual gamepad for runtime by creating instructions that loads the virtual gamepad UI canvas. You can do this with C++, Lua, or Script Canvas. For more information, see UICanvasManager and UICanvasComponent.
The following example Lua script displays a virtual gamepad UI canvas if touch screen support is detected.
local touchDevice =
    InputDeviceRequestBus.Event.GetInputDevice(InputDeviceId(InputDeviceTouch.name))
if (touchDevice and touchDevice:IsSupported()) then
    self.virtualGamepadCanvasId = UiCanvasManagerBus.Broadcast.LoadCanvas("UI/Canvases/VirtualGamepad/virtualgamepad.uicanvas");
end
The following example Lua script checks if a physical gamepad is connected. If found, the Lua script disables the virtual gamepad.
local gamepadDevice =
    InputDeviceRequestBus.Event.GetInputDevice(InputDeviceId(InputDeviceGamepad.name))
if (gamepadDevice and gamepadDevice:IsConnected()) then
    UiCanvasBus.Event.SetEnabled(self.virtualGamepadCanvasId, false);
end
The following Lua script enables the virtual gamepad when a physical gamepad is disconnected and disables the virtual gamepad when a physical gamepad is connected.
You can find a working example of this Lua script in the lumberyard_version\dev\SamplesProject\AnimationSamples\Advanced_RinLocomotion\Scripts\Advanced_RinLocomotion.lua file.
function Example:OnActivate()
    self.inputDeviceNotificationBus = InputDeviceNotificationBus.Connect(self);
end

function Example:OnInputDeviceConnectedEvent(inputDevice)
    if (inputDevice.deviceName == InputDeviceGamepad.name) then
        UiCanvasBus.Event.SetEnabled(self.virtualGamepadCanvasId, false);
    end
end

function Example:OnInputDeviceDisonnectedEvent(inputDevice)
    if (inputDevice.deviceName == InputDeviceGamepad.name) then
        UiCanvasBus.Event.SetEnabled(self.virtualGamepadCanvasId, true);
    end
end

function Example:OnDeactivate()
    if (self.inputDeviceNotificationBus) then
        self.inputDeviceNotificationBus:Disconnect();
    end
end