IN THIS ARTICLE
Kythera AI Gem Setup
Download the Kythera AI Gem .zip file from Kythera AI’s website .
Build the Kythera AI demo project
The KytheraAIDemo project is part of the downloaded zip file.
Make sure you have a working engine installation from the installer or an SDK installation as documented in the O3DE Setup Guide.
Extract all of the contents of the download zip file to a folder.
Open the O3DE Project Manager (
o3de.exe).Go to New Project… and select Add existing Project.
Select the
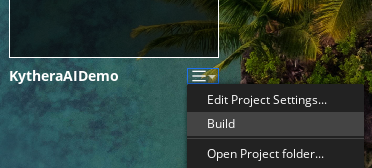
KytheraAIDemofolder in the unpacked zip folder.In the project menu, select Build.

Back in the O3DE launcher, click Open Editor.
After the Editor has launched, make sure that all assets have been processed in the Asset Processor (Status is Idle), otherwise opening our demo levels will throw errors.
Add the Kythera AI Gem to a project
The following steps work for both installed/SDK builds and engine centric builds:
- Unpack the zip file to a folder.
- Open a command prompt or PowerShell window inside your engine installation.
- Run the following command:
The Kythera Gem is the.\scripts\o3de.bat register -gp <path to the Kythera Gem> --external-subdirectory-project-path <path to your game directory>`Kytherasubdirectory in the unpacked zip folder. The command will add theexternal_subdirectorieskey to theproject.jsonfile and make the Gem available to your project. - Open the O3DE Project Manager (
o3de.exe). - In the project menu, click Edit Project Settings and then the Configure Gems button on the top right corner.
- Kythera AI should now be selectable as a Gem. Select it and save the project settings.
The project has to be rebuilt before Kythera AI components can be used.
