IN THIS ARTICLE
Working with UI Components
You can use the UI Editor to add and delete components, create references to UI elements for component properties, and manage components.
Adding or Deleting Components
You can add or delete components in the UI Editor.
To add a component to an element
In the UI Editor, select an element in the Hierarchy pane or in the Viewport.
To add components to multiple elements at once, use Ctrl to select multiple elements.
Do one of the following:
- At the top of the Properties panel, click Add Component.
- In the Properties panel, right-click and choose Add Component.
Select the component to add to the element: image, text, button, check box, slider, text input, scroll box, fader, mask, layout column, layout row, or layout grid.
See the instructions for the specific component that you’re adding.
To delete a component from an element
In the UI Editor, select an element in the Hierarchy pane.
In the Properties panel, right-click the component and click Remove.
Referencing UI Elements
You can specify a UI element for some properties on components. For example, you can specify UI elements for Lua Script properties.
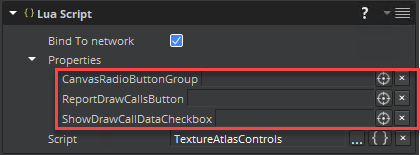
You can specify elements as properties either by dragging the element into the property field or by using the pick object button.
To drag a UI element into a property
- In the UI Editor’s Hierarchy panel, select an element and drag it to the component property in the Properties panel.
To use the pick object button to reference a UI element
In the Properties panel, next to the property to specify an element for, click the pick object button.
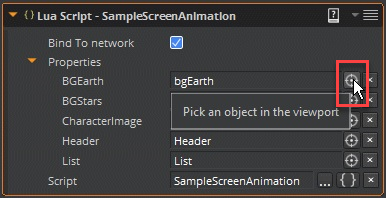
Select the element that you want from either the viewport or the Hierarchy panel.
The property populates with the UI element name.
To clear the element name from the property
- In the Properties panel, next to the property name, click x.
After you specify a UI element as a property, you can select that element from the Properties panel.
To select a UI element from the Properties panel
- In the Properties panel, double-click the element name.
Managing UI Components
You can use the context menu in the Properties panel to add, remove, cut, copy, and paste components.
To manage components from the context menu
In the Hierarchy panel, select the UI element.
In the Properties panel, either right-click the component or click the menu button in the header. Then choose one of the following:
- Add component - Add a component to the element
- Delete component - Remove a component from the element
- Cut component - Cut a component from one UI element to be pasted onto a different UI element
- Copy component - Copy a component from one UI element to be pasted onto a different UI element
- Paste component - Paste a component copied from one UI element onto a different UI element
You can also use the context menu to act on multiple components at once.
To perform actions on multiple components
Press Ctrl to select multiple components and then right-click to open the context menu.
Choose an action.
Note:The Element and Transform2D components are automatically added to a UI element and can’t be removed from the component list. Some actions are disabled, depending on the context. For example, you can’t paste a component if you haven’t copied one.
Create your UI Components: Cpp
An UI component is very similar to a game component. To create your first component follow the Creating a Component tutorial and change it from “Game” component to “UI” component. The components are usually created inside Gems, if you need to create your first gem, follow the Creating an O3DE Gem tutorial.
O3DE has LyShine as its default UI. If you intend to use any of its componenents, add LyShine as a build dependency in CMake.
Search for your CMakeLists.txt of your gem and reference the LyShine Gem under BUILD_DEPENDENCIES, PUBLIC. If you are only using this in your gem, you can add this under your Private.Object module.
# The ${gem_name}.Private.Object target is an internal target
# It should not be used outside of this Gems CMakeLists.txt
ly_add_target(
    NAME ${gem_name}.Private.Object STATIC
    NAMESPACE Gem
    FILES_CMAKE
        mycustomgem_private_files.cmake
        ${pal_dir}/mycustomgem_private_files.cmake
    TARGET_PROPERTIES
        O3DE_PRIVATE_TARGET TRUE
    INCLUDE_DIRECTORIES
        PRIVATE
            Include
            Source
    BUILD_DEPENDENCIES
        PUBLIC
            AZ::AzCore
            AZ::AzFramework
            LyShine
)
The above CMAKE configuration allows C++ to reference header (files) that are inside the LyShine Gem.
In your header file (of your custom component), you can then include the UiBus headers, at the beggining of the file (after #pragma once and before namespace).