UI Elements
UI elements are entities that you can attach multiple components to. You can start with an empty element and add components to it, such as a button, image, slider, text, and so on. Or you can add a pre-fabricated (prefab) UI element, such as a scroll box, which is an element with components already attached.

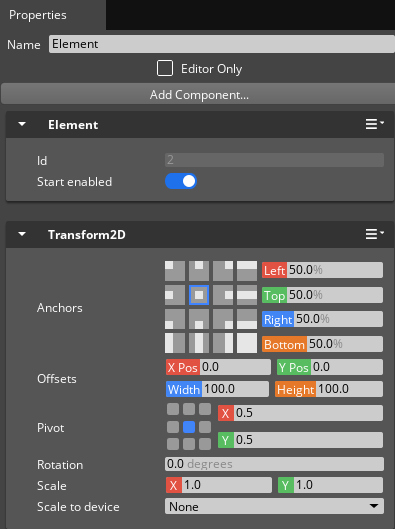
Every UI element has the following two required components that are added automatically:
The Element component identifies the element Id and presents the option to start in a disabled state.
The Start enabled option is selected by default. To start the element as disabled in the game, clear this option. When starting the element as disabled in the game, the player can’t see or interact with that element or its children. This setting has no effect on how the element appears in the UI Editor’s viewport.
The Transform2D component defines the positioning, spacing, and size of the element relative to its parent (whether its parent is the canvas or another element). For more information, see Transform2D Component.
When you select the Editor Only option, that element and its children exist only in the context of the UI Editor. For example, when the launcher, the game, or Preview mode in the UI Editor displays a UI canvas, elements marked Editor Only and its children don’t appear.
You can use Editor Only elements when you author a UI canvas and you want to display additional info or visuals that appear only when editing. For example, you can add a UI mockup image of the intended final canvas and mark it as Editor Only so that it’s visible only when editing the canvas. Those authoring the canvas can use the image as a guide to placing and configuring elements.
Note:Runtime references to the Editor Only element, such as from script or code, are invalid. You can reference Editor Only elements from other Editor Only elements. References to Editor Only elements from elements that aren’t Editor Only cause an error and possibly undefined behavior.
Each UI element can also have one visual component (image or text), one interactive component (button, check box, scroll box, slider, or text input), and one layout component (layout column, layout row, or layout grid). The remaining components are the mask and fader, either or both of which UI elements can attach.
For each of the following procedures, use the UI Editor to manage UI elements.
Managing UI Elements in the UI Editor
| Task | Steps |
|---|---|
| To find an element | In the UI Editor menu, choose Edit and then Find Elements or press Ctrl+F. For more information, see Searching for UI Elements. |
| To create an element | In the UI Editor toolbar, click New and then Empty element. The element appears in the Hierarchy pane and viewport. |
| To move, rotate, or resize an element | Select the element and then click the Move, Rotate, or Resize tool in the toolbar. Select Snap to grid to modify elements in increments. |
| To copy an element | Right-click the element in the Hierarchy pane or viewport and choose Copy. |
| To nudge an element | To nudge, or move, an element one pixel at a time, select the element and click the Move tool. Use arrow keys to nudge elements in the selected direction. Press and hold the Shift key while pressing the arrow keys to nudge elements 10 pixels at a time. |
| To paste a copied element | Right-click anywhere in the Hierarchy pane or viewport and choose Paste. If an element is selected, the Paste as sibling and Paste as child options appear. |
| To delete an element | Right-click the element in the Hierarchy pane or viewport and choose Delete. |
| To hide an element | Click the eye icon (to the right of the element name) in the Hierarchy pane or viewport. Click again to show the element. When hiding or unhiding (showing) an element, the following behaviors apply: |
| To hide all elements | To hide all elements, clear any selected items and then click the eye icon in the top row of the Hierarchy pane. |
| To prevent selection of an element in the viewport | Click the padlock icon to the right of the element name in the Hierarchy pane. This prevents selection only of that particular element; its children are still selectable. |
| To prevent selection of all elements in the viewport | Clear any selected elements (click in a blank area of the Hierarchy pane) and then click the padlock icon in the top row of the Hierarchy pane. |
| To rename an element | Double-click the element in the Hierarchy pane, enter the new name, and press Enter. |
| To nest an element | Select the element in the Hierarchy pane and drag it on top of the parent element. |
| To change the element draw order | Select and drag elements up or down in the Hierarchy pane. Elements are drawn in order starting from the top of the hierarchy list, so elements at the bottom of the list appear in front of elements at the top of the list. |
