IN THIS ARTICLE
Project Export for Windows and Linux
Prerequisites
To make best use of the export button in the Project Manager, or the export-project CLI command, it is recommended to have a project with at least one starting level, and all necessary seedlist files prepared. AssetProcessor Registry file settings may need to be tweaked. To learn how to set this up, please consult the following page:
Creating a Project Game Release Layout for Windows, section: Set the Starting Level.
To learn more about the AssetBundler and Seed Files, please visit the overview page on the AssetBundler tool .
Note:If you wish to learn how to prepare projects manually for Windows, please consult the page Creating a Project Game Release Layout for Windows.
Using Project Manager
Getting Started
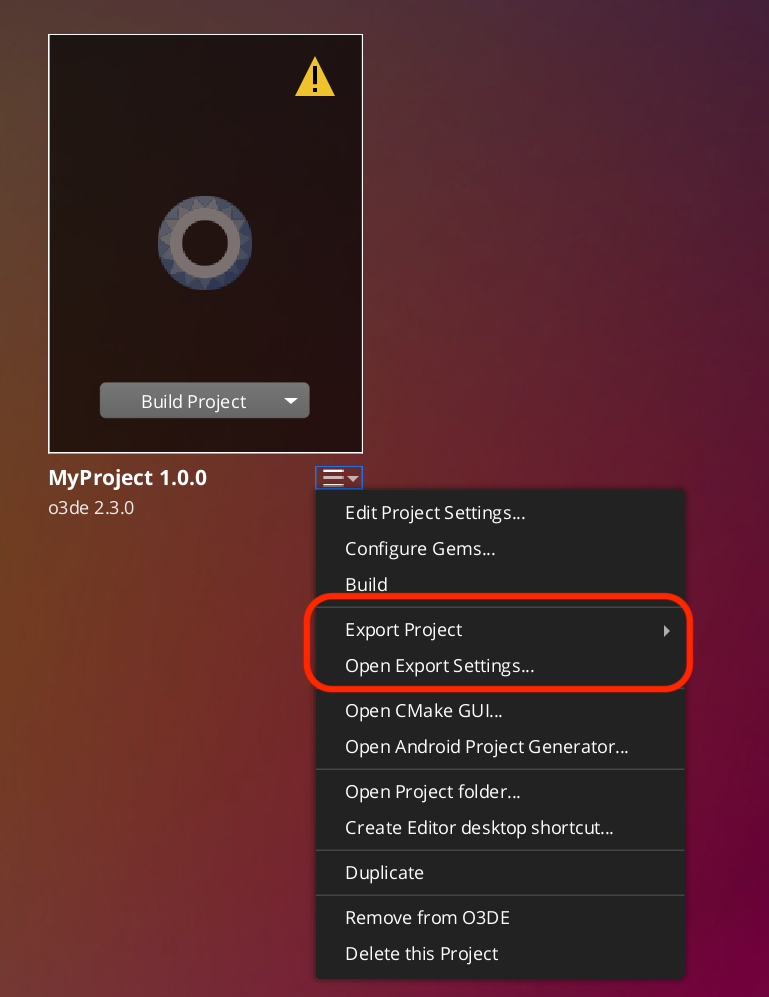
Using the export feature in Project Manager is similar to building projects, in that it only takes a single action to kick off the export process. Click the dropdown for your desired project card to see the export options listed below.

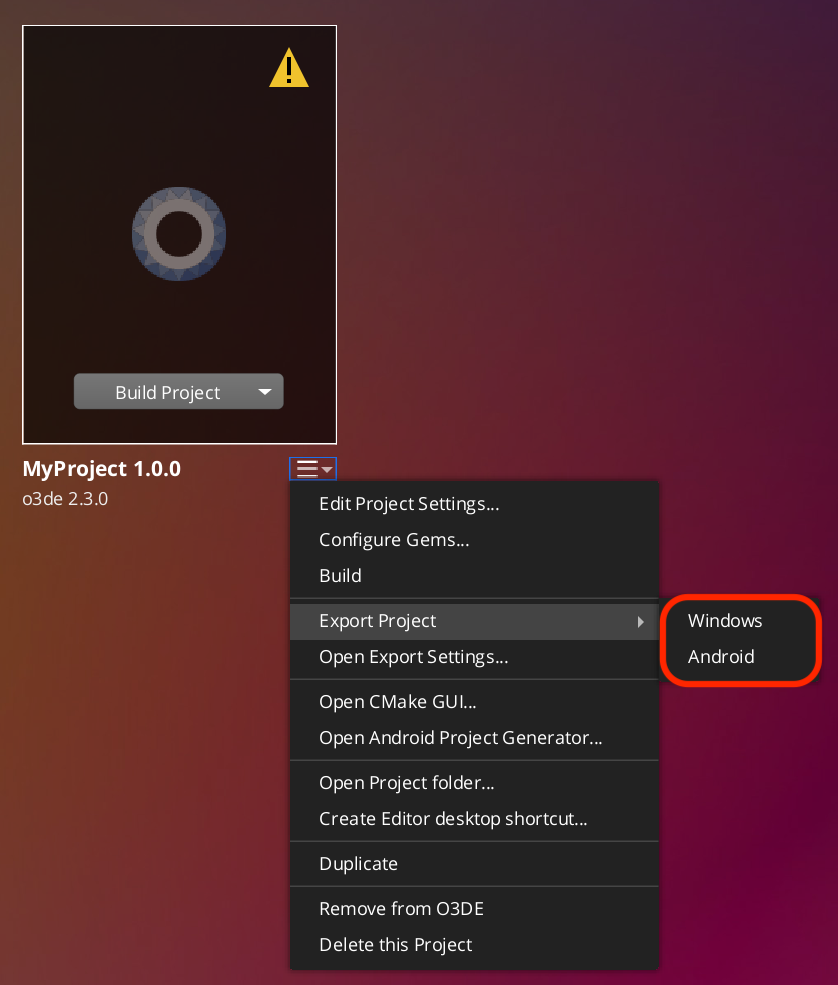
The Export Launcher option shows a sub-menu of platforms to run the export process for. The top-most option always matches the operating system of your development machine.

Upon clicking one of the platform options, the export process will begin. A confirmation popup will ask if you wish to proceed, and remind you to check the export settings if you have not already.

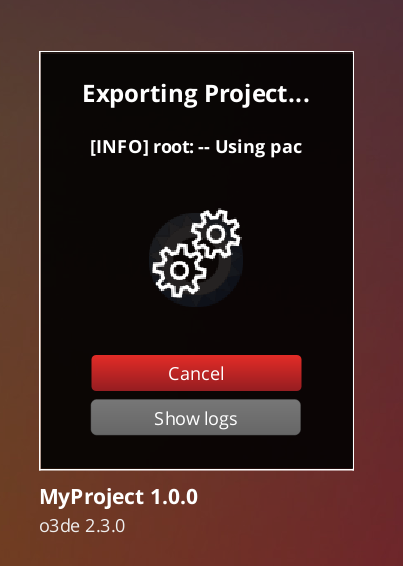
Once you have confirmed you are ready to proceed, the Project Manager will begin exporting your project. If you picked the Windows/Linux platform, it will create a PC based game launcher based on the export settings. The final output will be located in directory specified by the “Output Path” setting in the export settings panel.

Export Settings Panel
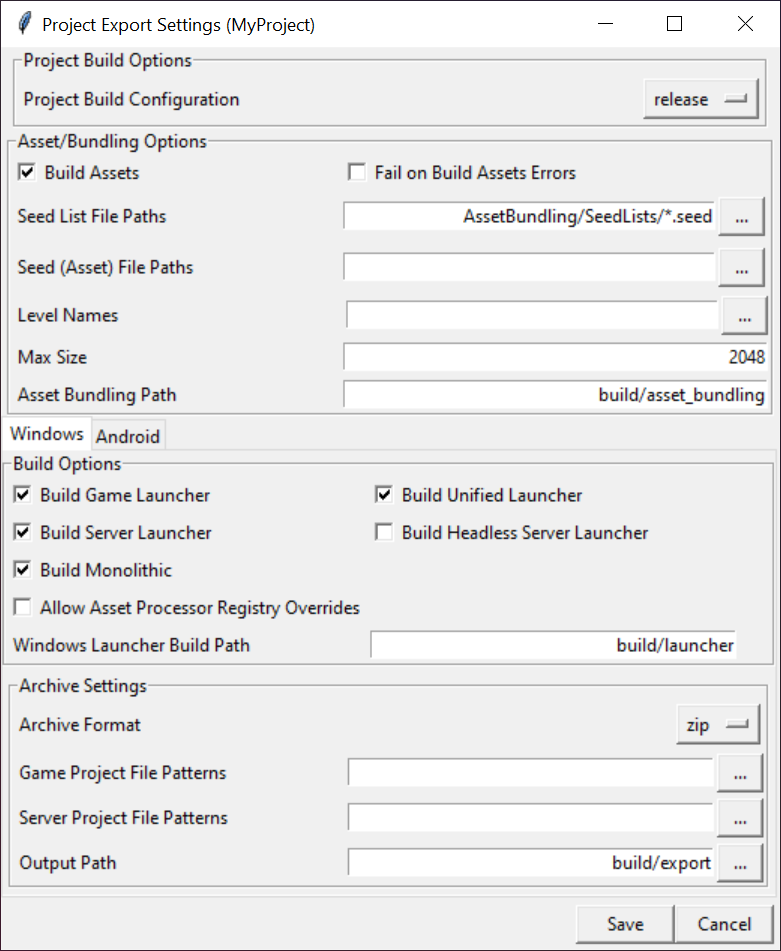
To access the Export Settings Panel, simply click the “Open Export Settings…” button in the dropdown shown in the previous section. Upon clicking it, you should see the following form.

The panel is divided into two main sections. The top half of the panel contains settings that are common across all supported platforms for O3DE. The bottom half contains platform specific settings separated by tabs. In this guide we will focus on the “Windows” tab (note: this tab will be appropriately named “Linux” if you are developing from a Linux distro).
To learn more about each setting, you can hover the mouse over the text label of each setting to get a tooltip description. Alternatively, you can consult this CLI parameter table to see the parameters that the Export settings are based on.
Using CLI
The export-project CLI command is used to automatically package game code and assets for a release.
Getting Started with CLI and Scripts
To use the export-project command correctly, it is important to first understand how it works at a high level.
The command operates in 2 stages:
- Script Loading
- Script Running
Script Loading
Before the export process can begin, the export-project command does the following pre-processing steps:
- Parse and validate initial set of arguments, and filters arguments to be processed by desired export script
- Load the export script as a python module
- Validate the expected project path
- Modify the system path with O3DE CLI Python API so that user scripts can easily import API code and modules
- Prepares the O3DE script context, which contains useful values like project path, engine path, project name, CMake args, etc.
- Runs the export script with the prepared context injected
Script Running
The export-project command can run any python script that the user designates as the export script. As a result, the exact behavior entirely depends on the supplied script. O3DE includes a standard script, which is described
further below.
Any script run by the command has access to the running context of the exporter, along with common APIs.
Export CLI Command
The export-project command is accessed via the O3DE CLI that is shipped with the engine. This is found in <engine>/scripts/o3de.bat, or on Unix systems as <engine>/scripts/o3de.sh. The command has the following arguments:
| Argument Name | Description | Required? |
|---|---|---|
--export-script | Choose an external python script to run. The path can be relative or absolute. | yes |
--project-path | Project to export. The path can be relative or absolute. If not supplied, it will be inferred by the export script location. | no |
--log-level | Sets the verbosity of the logs emitted from the exporter. INFO means all information will be emitted. ERROR means it will be silent unless a failure occurs. Choices are [DEBUG, INFO, WARNING, ERROR, CRITICAL], with ERROR as the default. | no |
You can inspect the code for parsing arguments here.
An example invocation may look like this:
<engine-folder>\scripts\o3de.bat export-project --export-script C:\..\path\to\export-script --project-path C:\..\path\to\project-folder --log-level INFO
or in condensed form:
<engine-folder>\scripts\o3de.bat export-project -es C:\..\path\to\export-script -pp C:\..\path\to\project-folder -ll INFO
Project Template
Project Export functionality is also available on a per-project basis. This is because there are helper export scripts that are included in the Project Templates, as can be seen with
package.bat and
package.sh for Unix . These scripts are included at the root folder of every new Project created with the DefaultProject template.
The package scripts pre-populate the relevant arguments for the given project, and then call export-project on the user’s behalf.
In order to use it, simply run the following command (assuming project has already been created and registered):
# On Windows
\path\to\project\package.bat

#On Unix
\path\to\project\package.sh
Standard Export Script
O3DE now ships with a standard project export script , capable of automating most typical use cases of projects. The code and API are provided so that users with more particular needs can investigate, expand or modify the code as necessary. Currently this script only supports Windows and Linux platforms, and does not handle deployment to external services.
The export script has 2 primary sections: the function
export_standalone_project and the
startup code that only runs if the script is invoked by the CLI . In-depth discussion on these two sections can be found in the
Developer Guide.
Usage
To use the export script, first ensure you have the necessary seedlist files for your project (as mentioned in the prerequisites).
You can issue the arguments for this script at the same time that you are running the export-project command, so long as you are using the script as your designated export script. The arguments specific to the script will be deferred until the script begins running.
The arguments are as follows:
| Argument Name | Description | Required? |
|---|---|---|
--script-help | Display the help information specifically for the export script. | no |
--output-path | Defines the location on the system where the release layout directory for the project should be located. For each desired launcher, a separate release folder will be prepared. | yes |
--config | Defines the CMake build configuration when building the project’s binaries, such as GameLauncher. Options are either profile or release. Default is profile | no |
--archive-output | Automatically archive the output release directories as bundled archive files, such as zip files. | no |
--should-build-assets | This will process all assets in the project according to asset processor settings, and run the asset bundler as well for specified seedlist files. Omit this if you do not want to process any assets. If assets are not already present, the release package will not run. As such, it is recommended to include this flag if assets do not already exist. | no |
--fail-on-asset-errors | Forcibly fail the export process should errors with assets be encountered. This is not enabled by default, as asset errors are common, and usually not severe. Use this if stricter validation is required. | no |
--seedlist | Path to a seedlist file for asset bundling. Specify multiple times for each seed list | no |
--project-file-pattern-to-copy | Any additional file patterns located in the project directory. File patterns will be relative to the project path. Use this for any file not traditionally associated with O3DE projects, such as custom config files, metadata, or license files. | no |
--game-project-file-pattern-to-copy | Like --project-file-pattern-to-copy, but for files exclusive to Game Launchers. | no |
--server-project-file-pattern-to-copy | Like --project-file-pattern-to-copy, but for files exclusive to Server Launchers. | no |
--build-tools | Specifies whether to build O3DE toolchain executables. This will build AssetBundlerBatch, AssetProcessorBatch. If asset tools have not been built, then assets cannot be processed. | no |
--tools-build-path | Designates where the build files for the O3DE toolchain are generated. If not specified, default is <o3de_project_path>/build/tools. | no |
--launcher-build-path | Designates where the launcher build files (Game/Server/Unified) are generated. If not specified, default is <o3de_project_path>/build/launcher. | no |
--allow-registry-overrides | When configuring cmake builds, this determines if the script allows for overriding registry settings from external sources. These overrides are used when building the game binaries, specifically for enabling the CMake build flag DALLOW_SETTINGS_REGISTRY_DEVELOPMENT_OVERRIDES. For more information, consult the
Settings Registry overview | no |
--asset-bundling-path | Designates where the artifacts from the asset bundling process will be written to before creation of the package. If not specified, default is <o3de_project_path>/build/asset_bundling. | no |
--max-bundle-size | Specify the maximum size of a given asset bundle. | no |
--no-game-launcher | This flag skips building the Game Launcher on a platform if not needed. | no |
--no-server-launcher | This flag skips building the Server Launcher on a platform if not needed. | no |
--no-headless-server-launcher | This flag skips building the Headless Server Launcher on a platform if not needed. | no |
--no-unified-launcher | This flag skips building the Unified Launcher on a platform if not needed. | no |
--platform | The expected target platform that assets will be processed and built for. If not specified, the user’s host platform will be used. | no |
--engine-centric | Use the engine-centric work flow to export the project. | no |
--quiet | Suppresses logging information unless an error occurs. | no |
An example usage of the entire export-project command, including this script, can be seen for the O3DE MultiplayerSample project, with the following example for windows:
# On Windows
%O3DE_ENGINE_PATH%\scripts\o3de.bat export-project \
    --export-script %O3DE_ENGINE_PATH%\scripts\o3de\ExportScripts\export_source_built_project.py \
    --project-path %O3DE_PROJECT_PATH% -out %OUTPUT_PATH% \
    --config release \
    --archive-output zip -nounified \
    --game-project-file-pattern-to-copy launch_client.cfg \
    --server-project-file-pattern-to-copy launch_client.cfg \
    --should-build-assets \
    --log-level INFO \
    --seedlist \path\to\o3de-multiplayersample\AssetBundling\SeedLists\BasePopcornFxSeedList.seed \
    --seedlist %O3DE_PROJECT_PATH%\AssetBundling\SeedLists\GameSeedList.seed \
    --seedlist %O3DE_PROJECT_PATH%\AssetBundling\SeedLists\VFXSeedList.seed
Where O3DE_ENGINE_PATH, O3DE_PROJECT_PATH and OUTPUT_PATH are environment variables. This single invocation should be all that is needed to fully export MultiplayerSample into a release directory ready for distribution.
For more information on how to export the MultiplayerSample project using the CLI, please see these instructions .
Custom Scripts
You can study the standard export script to understand how the export-project API works, but this section will help provide a high level overview of what’s available.
O3DE Context and Logger
All export scripts are automatically injected with 2 global variables when the export-project command is run: o3de_context, and o3de_logger.
o3de_context is an instance of the
export_project.O3DEScriptExportContext class. This context object is used to store parameter values and variables throughout the lifetime of an export script’s execution. It also stores convenient properties such as the export script’s path, project path, engine path, unprocessed arguments, cmake specific arguments, and the project name from the project.json file.
For any APIs of export-project that expect a parameter of type O3DEScriptExportContext, you can pass in the o3de_context of your running export script.
o3de_logger is an instance of the logging.Logger class from the Python standard library, which can be used to track and emit logs over the course of the script’s lifetime.
API
For users wishing to create custom export scripts, the export-project command exposes the following APIs (please click the links in the function name to view details on parameters):
| Function Name | Description |
|---|---|
| get_default_asset_platform | Fetches the user’s host platform based on O3DE convention. |
| process_command | Allows the user to run terminal commands as a subprocess, either by supplying the full command as a string, or as a string list. |
| execute_python_script | Execute a new python script, using new or existing O3DEScriptExportContexts to streamline communication between multiple scripts. |
| get_asset_processor_batch_path | Get the expected path to the asset processor tool. |
| get_asset_bundler_batch_path | Get the expected path to the asset bundler tool. |
| build_assets | Build the assets for the project. |
| build_export_toolchain | Build (or rebuild) the export tool chain (AssetProcessorBatch and AssetBundlerBatch). |
| validate_export_toolchain | Validate that the required command line tools are available for the export process. |
| build_game_targets | Build the launchers for the project (game, server, unified, headless). |
| bundle_assets | Execute the ‘bundle assets’ phase of the export. |
| setup_launcher_layout_directory | Setup the launcher layout directory for a path. |
| validate_project_artifact_paths | Validate and adjust project artifact paths as necessary. If paths are provide as relative, then check it against the project path for existence. |
Example Custom Scripts
To demonstrate the basic functionality of the API, we will look at an example script using 2 functions: execute_python_script and process_command, which are the building blocks for the rest of the functionality.
test_export.py
Here is an example test export script:
#test_export.py
import os
import o3de.export_project as exp

from o3de.export_project import process_command, execute_python_script


o3de_context.message1 = "This is a message!"
o3de_context.message2 = "___"
o3de_context.hi_there = "hi there!"
o3de_context.hi_there_2 = 22


process_command(["cmake", "--version"])


execute_python_script("C:\\Users\\O3DE_User\\Desktop\\hello.py", o3de_context)

o3de_logger.info(f"Now running the export code {o3de_context.project_path}")
o3de_logger.info(f"Engine path: {o3de_context.engine_path}")

o3de_logger.info(o3de_context.hello_back)

o3de_logger.info(o3de_context.message2)
First thing to notice is that at the top, users can import existing O3DE Python modules such as export_project, manifest, utils, validation, etc., just like they normally import other python modules in the standard library. All such modules can be found
here on Github . This is because the export-project tool handles system paths behind the scenes to make the O3DE CLI folder and the export script’s folder accessible from the import system.
The next thing to notice is that o3de_context is available as a global context. Along with the standard properties, users can add their own custom values to retain over the lifetime of the script.
With process_command, users can run any terminal command that they wish. This makes it very easy to convert manual processes into a usable script (and most of the time, you can use process_command alone if you so desire). All you would need is to ensure that the process has an equivalent command to run on the terminal.
The function export_python_script does something special here. It’s able to run another python script anywhere on the machine, while supplying it the same o3de_context the current export script is using. This can allow for very modular scripting abilities. Let us take a closer look at hello.py to see what it does.
hello.py
#hello.py
import o3de.export_project as exp


i = 0

while i < 10:
    print(f"hi {i}:: {o3de_context.hi_there_2}")
    i+=1

o3de_logger.info(o3de_context.hi_there)
o3de_logger.info(o3de_context.message1)
o3de_logger.info(o3de_context.project_path)


o3de_context.hello_back = "Hello to you too!"

o3de_context.message2 = "hiya!"
hello.py readily takes on the context of the original export script, and is even able to access previously defined variables, such as hi_there_2, hi_there, message1, and message2.
Not only can it read them, but it can also overwrite an existing variable, such as with message2, changing it from '____' to 'hiya!', or even introduce new variables like hello_back, which upon completion of hello.py will be visible to the test_export.py script.
The Results
If you were to run the test_export.py script on Windows, this is what the logs would show:
<engine-path>\scripts\o3de.bat export-project -es C:\workspace\projects\NewspaperDeliveryGame\export_rules\test_export.py -ll INFO

[INFO] root: Begin loading script 'C:\workspace\projects\NewspaperDeliveryGame\export_rules\test_export.py'...
[INFO] root: Running process 'cmake' with PID(28996): ['cmake', '--version']
[INFO] root: cmake version 3.24.1

[INFO] root:

[INFO] root: CMake suite maintained and supported by Kitware (kitware.com/cmake).

[INFO] root:
[INFO] root: Terminating process 'cmake' with PID(28996)
[INFO] root: process 'cmake' with PID(28996) terminated with exit code 0
[INFO] root: Begin loading script 'C:\Users\O3DE_User\Desktop\hello.py'...
hi 0:: 22
hi 1:: 22
hi 2:: 22
hi 3:: 22
hi 4:: 22
hi 5:: 22
hi 6:: 22
hi 7:: 22
hi 8:: 22
hi 9:: 22
[INFO] root: hi there!
[INFO] root: This is a message!
[INFO] root: C:\workspace\projects\NewspaperDeliveryGame
[INFO] root: Now running the export code C:\workspace\projects\NewspaperDeliveryGame
[INFO] root: Engine path: C:\workspace\o3de
[INFO] root: Hello to you too!
[INFO] root: hiya!
[INFO] o3de: Success!
This example is based on the original PR for the Project Export tool .
