Retargeting Motions
Use the Animation Editor to retarget motions from one actor to another actor. This lets you reuse motions that you’ve created for an actor, and to quickly prototype motions on other actors while you wait for new ones to be created. The retarget feature is also important to ensure that actors are scaled appropriately. Without this feature, the retargeted actor stretches and scales to the size of the original actor for which the motion was recorded. With this feature, the retargeted actor retains its size.
For example, you may have a human character that’s six feet tall and your motions are recorded for that actor. You may also have a giant character that’s 18 feet tall. If you play the motions for the human character on the giant character without retargeting, the giant character will scale to the size of the human character. When you enable the retarget feature, the giant character retains its height of 18 feet.
Important:To retarget motions, your assets must meet these requirements:
The first frame in every motion must be the actor’s bind pose. For example, if you have an animation that contains frames 1-100, the actor’s bind pose (skinned mesh and bones) must be added at frame 0.
The bone names and hierarchy must be identical between the original actor and the retargeted actor. The retargeted actor may contain additional leaf bones in its hierarchy, but the areas of the hierarchy that are being retargeted must be identical.
Note:If your retargeted actor has the same bone names and transforms as the original actor, you do not need to use the retarget motions procedure.
To retarget motions
In your DCC tool, add the actor’s bind pose, which includes skinning and bones, to the first frame of your motion. Then export the file into O3DE.
Open O3DE Editor.
In the Asset Browser, right-click the file that you imported, and choose Edit Settings.
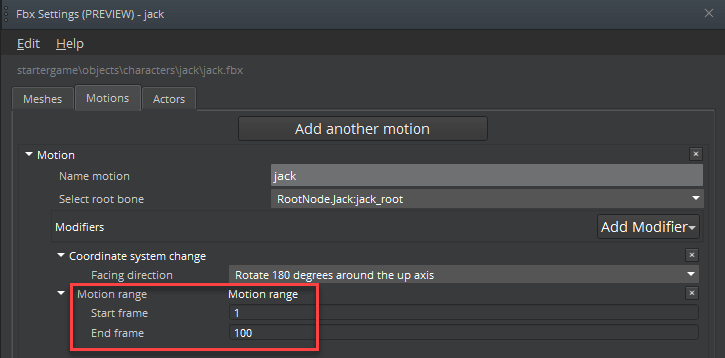
In the Fbx Settings window, on the Motions tab, choose Add Modifier, Motion range.
Note:If you do not see the Motion range modifier, be sure that your.fbxfile has keyframes.Under Motion range, do the following:
Set the Start frame to the frame that does not include the bind pose. For example, if the original actor’s bind pose is on frame 0, set the Start frame to 1. This ensures that the bind pose does not play in your motion.
Set the End frame to the last frame of your motion. Based on the example in the previous step, the last frame would be 100.
Click Update.
Note:If you receive an error, check the number of keyframes in your motion, and update the End frame.The frame settings are shown in the following example:

Repeat steps 1 to 5 for all of the motions that you want to retarget.
In O3DE Editor, choose Tools, Animation Editor.
In the Animation Editor, in the center pane, on the Anim Graph tab, open your animation graph.
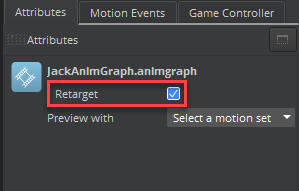
In the right pane, on the Attributes tab, select the Retarget check box.
 Note:You can also toggle the retarget feature on the Motion, Blend Space 1D, and Blend Space 2D nodes.
On the Anim Graph tab, save your animation graph.
To now use your motions and animation graph on a different actor:
In the Animation Editor, choose File, Open Actor, and select the actor to retarget.
In the center pane, on the Motion Sets tab, open the motion set that has the motions that you previously modified.
In the center pane, on the Anim Graph tab, open the animation graph that you previously saved.
Verify that the actor with the retargeted motions and animation graph behave like the original actor.
