IN THIS ARTICLE
Adding Scale, Rotation, and Position Modifiers
Before you can complete this procedure, you must first create a vegetation layer.
If you have added a gradient for random selection, the vegetable selection appears random, but still produces a grid-like pattern. This is because each type of vegetation is all the same size, faces the same direction, and is indeed planted on points on a grid.
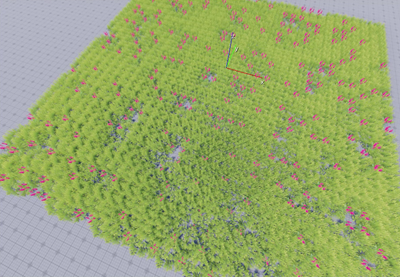
To remedy this, do the following:
- Add a scale modifier - Varies the size of the vegetation. You can specify a range of scale, which sizes vegetation up or down while maintaining original proportions.
- Add a rotation modifier - Changes the direction that vegetation faces. In this procedure, you modify only the z-axis rotation.
- Add a position modifier - Modifies where on the grid points the plants appear. You can shift them by varying amounts on the x-, y-, and z-axes. Modifying the x- and y-axes moves the plants on the ground plane. Modifying the z-axis changes the height at which a plant sprouts (this procedure doesn’t modify the z-axis).
Applying modifiers to your vegetation gives it a realistic, natural look.
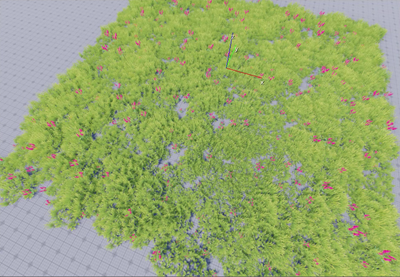
Adding a Scale Modifier
A scale modifier varies the size of the vegetation.
To add a scale modifier
Select the BasicCoverage entity.
In the Entity Inspector, add the Vegetation Scale Modifier component.
By itself, this component has no effect because there is not yet any information that tells it how to distribute the values.
In the Vegetation Scale Modifier component’s properties, under Gradient, next to Gradient Entity Id, click the target.
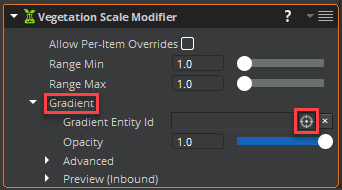
In the Entity Outliner, select Gradient.
The Gradient Entity Id field populates with the entity name.
This component has a Range Min and Range Max both set at 1.0 by default, so there are no results yet.
Adjust the Range Min value to
0.4and the Range Max value to1.25.Range Min sets the scale size for the gradient signal’s lowest values. Range Max sets the scale size for the gradient signal’s highest values. Because the gradient signal varies in range from black to white, a scale value between the minimum and the maximum is applied to that vegetation instance.
Adding a Rotation Modifier
A rotation modifier varies the rotation of the vegetation.
To add a rotation modifier
Select the BasicCoverage entity.
In the Entity Inspector, add the Vegetation Rotation Modifier component.
By itself, this component has no effect because there is not yet any information that tells it how to distribute the values.
In the Vegetation Rotation Modifier component’s properties, under Rotation Z, Gradient, next to Gradient Entity Id, click the target.
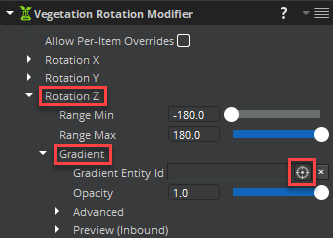
In the Entity Outliner, select Gradient.
The Gradient Entity Id field populates with the entity name.
Adding a Position Modifier
A position modifier shifts each instance of vegetation by an amount that the gradient determines, which removes the grid-like appearance of the vegetation.
To add a position modifier
Select the BasicCoverage entity.
In the Entity Inspector, add the Vegetation Position Modifier component.
By itself, this component has no effect because there is not yet any information that tells it how to distribute the values.
In the Vegetation Position Modifier component’s properties, under Position X, Gradient, next to Gradient Entity Id, click the target.
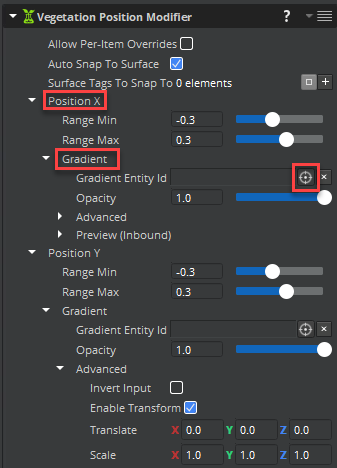
In the Entity Outliner, select Gradient.
The Gradient Entity Id field populates with the entity name.
The result is a slight x-axis variation in the ranges specified (the default is -0.3 to 0.3). For greater variation, modify the Range Min and Range Max values.
In the Vegetation Position Modifier component’s properties, under Position Y, Gradient, next to Gradient Entity Id, click the target.
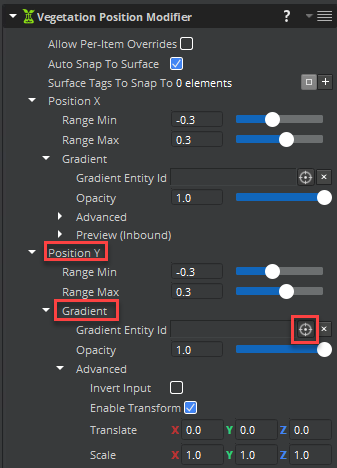
In the Entity Outliner, select Gradient.
The Gradient Entity Id field populates with the entity name.
In this procedure, you pass the same gradient signal to both the x and y modifiers, resulting in the same offset for both. This shifts all the vegetation in a common diagonal direction instead of varying the x from the y.
You can override this by providing some additional values in the Position Y properties.
Note:You can also overcome this issue by using a gradient modifier on your existing gradient or by creating a separate gradient and linking to it.Under Position Y, expand the Advanced header and check Enable Transform.
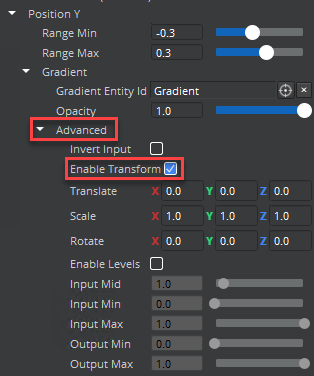
- To produce a swizzling effect on the y-axis, use the following values or a variation on them.
| X | Y | Z | |
|---|---|---|---|
| Translate | 0.5 | 0.5 | 0.0 |
| Scale | -1.0 | -1.0 | 1.0 |
| Rotate | 0.0 | 0.0 | 45.0 |
